
YES - ONE SIZE DOES NOT FIT ALL
First - you have to understand your head’s shape.
Head shapes generally fall into three categories - Round Oval, Intermediate Oval or Long Oval.
Round Oval is the most common human head shape.
Drivers with Long Oval heads have the greatest difficulty finding a comfortable fit. We direct our customers to Brands which lean towards a motorcycle profile, such as Arai & HJC, or models that are designed for open cockpit racing - they have a slimmer, more aerodynamic design such as Bell’s K1 Pro, GP3 & GTX3.
Helmets are expensive, but they are designed to protect one of your most critical assets - skull/brain.
Finding your head shape should not be a guessing game. Your safety, focus, performance and comfort will all be compromised with an ill fitting helmet.
Visit or contact Track First and we will use our years of experience to advise you on your options for a great fit

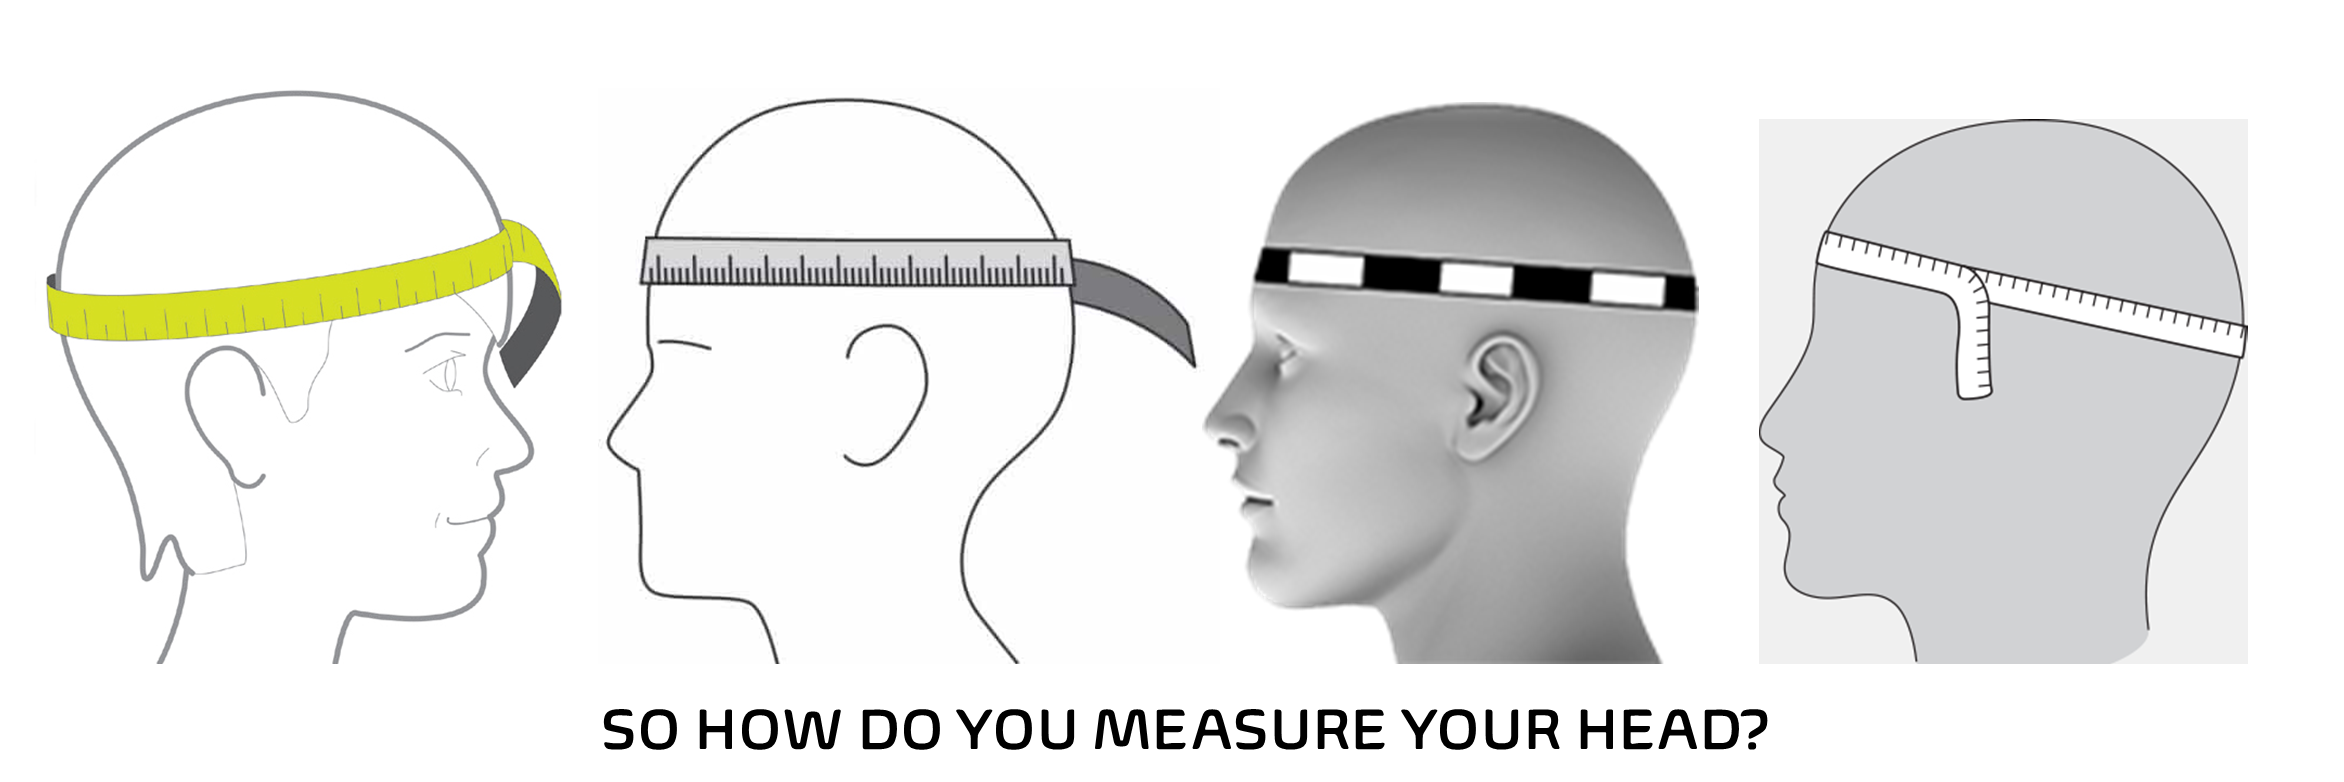
Helmet manufacturers often display how to measure your head. Please follow the above images. You must measure around the largest circumference of your head - try more than once.
We suggest you measure in centimeters, using a soft measuring tape. Centimeters allow a more accurate reading, plus relate well to universal helmet sizing charts.

TO TRY A HELMET ON…
Grasp the helmet by the chin straps, with the front of the helmet towards you and the top of the helmet facing down
Place the thumbs on the inside surface of the straps and balance the helmet with the index fingers
Spread the helmet apart with the hands and slip down over the head
The helmet should fit ‘snug.’ If it slides on too easily; it is too big for you. If you cannot pull it down, completely over your head - it is too small for you. If you are in pain - it is definitely the wrong helmet!
Move your head distinctly to the left or right (not shake.) With a good fit, the helmet should move with you
We know - one size does not fit all.
First, we have to understand your head’s shape.
Head shapes - Round Oval, Intermediate Oval or Long Oval. Round Oval is the most common human head shape.
Drivers with Long Oval heads have the greatest difficulty finding a comfortable fit. We direct our customers to Brands which lean towards a motorcycle profile, such as Arai & HJC. Or models that are designed for open cockpit racing - they have a slimer, more aerodynamic design such as Bell’s K1 Pro, GP3 & GTX3.
Helmet manufacturers will display how to measure your head. Please follow the above images. You must measure around the largest circumference of your head - try more than once.
We suggest you measure in centimeters, using a soft measuring tape. Centimeters allow a more accurate reading, plus relate well to universal helmet sizing charts.
To try a helmet on…
Grasp the helmet by the chin straps, with the front of the helmet towards you and the top of the helmet facing down
Place the thumbs on the inside surface of the straps and balance the helmet with the index fingers
Spread the helmet apart with the hands and slip down over the head
The helmet should fit ‘snug.’ If it slides on too easily; it is too big for you. If you cannot pull it down, completely over your head; it is too small for you. If you are in pain; its definitely the wrong helmet!
Move your head distinctly to the left or right (not shake.) With a good fit, the helmet should move with you
The key points to a good fit are….
a) Avoid pressure points - those on the skull’s temple, forehead and sometimes the top of the head. These are areas where the head comes in contact with the life-saving, ‘crush-zone’ foam. If you are feeling pressure at these points, go up a size of try another model. The foam is dense and will not compress, so the discomfort will only persist and probably get worse.
b) Observe your cheeks. A good fit has your cheeks semi-squashed, but not so you are biting the inside of your cheeks. The inner layer of foam (fit-pads) of a helmet is always covered in a fire-retardant fabric . These fit-foam pads are not an integral to the helmet’s safety impact features. They exist to facilitate a good and comfortable fit by filling the gaps between your head’s varying contours and the dense ‘crush-zone’ foam. Some tightness here is OK - this foam will soften with repeated use. In many cases this foam can be removed for cleaning , replacement and/or fitting electronics inside the helmet.
c) Your head should not be moving independently to your helmet. You do not need to shake your head repeatedly or violently when trying on a helmet. Use a quick movement side-to-side and up-and-down - replicating how your head would move inside the car. If your head and helmet are not moving together - the helmet is too large. We look for a snug fit.
d) When trying on a helmet make sure you have the helmet positioned correctly on your head. If you can see the shadow of the foam above the eye port by just lifting your eyes - you have the correct position. Always check this before going on the track. Many people wear their helmet too far back.
e) Varying chin profiles Long, large and low chins are harder to accommodate. We prefer to see that ALL your head is protected by the helmet. If your chin is exposed - choose another helmet and/or brand. Brands that are more closely related to the motorcycle profile better accommodate long chins.
Also the more aerodynamic shells with duckbills work better with long oval heads and long chin profiles .
Be aware, that introductory price helmets and introductory priced brands often sport a smaller, compact shell. They will be tighter, and do not sit low on the head. We advised you choose a larger size.
f) Remember to exist all SNELL & FIA helmets have been tested (and passed) stringent safety standards. This does include many other parts of the helmet, such as the tethers, the bolts, visors, anchor kits. Remember it is a minimum standard - many helmets will exceed the tests demands, others will have matched them.
g) The increased price of the helmet will reflect the superior quality, comfort levels, fitment & increased head protection, plus offer more advanced features and technology. A more budget-friendly, introductory helmet is usually heavier with less comfort, more ridged interior padding and offers fewer sizing options.
f) Remember the helmet increases your height. Fitting you and your helmet in your car without touching the head liner (or worse) can be an issue. It is a frequent problem for our customers who are tall, with older model sports cars, severe sloping roofs and/or compact cockpits. The larger round shaped shells such as offered by BELL can be a problem. However, we have successfully switched to other Bell helmet profiles

The key points to a good fit are….
a) Avoid pressure points - those on the skull’s temple, forehead and sometimes the top of the head. This is where the head comes in contact with the ‘crush-zone’ foam. If you are feeling pressure at these points, go up a size of try another model, since the problem will only persist and probably get worse.
b) Observe your cheeks. A good fit has your cheeks semi-squashed but not so you are biting the inside of your cheeks. The inner layer of foam (fit-pads) of a helmet is always covered in a fire-retardant fabric . These fit-foam pads are not an integral to the helmet’s safety impact features. They exist to create a good and comfortable fit by filling the gaps between your head and the more dense ‘crush-zone’ foam. Tightness here is OK - this foam will soften with repeated use.
c) Your head should not be moving independently to your helmet. You do not need to shake your head repeatedly or violently when trying on a helmet. Use a quick movement side-to-side and up-and-down - replicating how your head would move inside the car. If your head and helmet are not moving together - the helmet is too large.
d) First make sure you have the helmet positioned correctly. If you can see the shadow of the foam above the eye port by just lifting your eyes - you have the correct position. Always check this before going on the track.
e) Varying chin profiles Long, large and low chins are harder to accommodate. We prefer to see that ALL your head is protected by the helmet. If your chin is exposed - choose another helmet.
The more aerodynamic shells with duckbills work better with long oval heads and long shin profiles .
Be aware, that introductory price helmets and lower priced brands often sport a smaller, compact shell. They will be tighter, and do not sit low on the head. We advised you choose a larger size.
f) Remember the helmet increases your height. Fitting you and your helmet in your car without touching the head liner (or worse) can be an issue. It is a frequent problem for our customers who are tall, with older model sports cars, severe sloping roofs and/or compact cockpits. The larger round shaped shells such as offered by BELL can be a problem. However, we have successfully switched to BELL’s K1 PRO.